This guide explains the way to configure the basic features, such as Onboarding (welcome screen), Require Login before using, Splash screen, loading Animation, left menu (side menu), Product Detail screen, Settings screen (Profile screen), price Filters, Google Analytics, etc.
1. Use the FluxBuilder tool
- You can use the FluxBuilder tool to configurate some Basic features easily by drag & drop, then Export the custom Features to
/libfolder in source code. Refer to the guide of FluxBuilder. Make sure you use the latest version.- Check out Videos guide of FluxBuilder.
You also can manually customize your app source code by following sections:
2. Onboarding and Login mode
To customize the onboarding content (welcome screen), open lib/env.dart file, update onBoardingData. (For version 1.9.x and earlier, refer to lib/common/config/onboarding.dart).
/// the welcome screen data
/// set onBoardingData = [] if you would like to hide the onboarding
  "onBoardingData": [
    {
      'title': 'Welcome to FluxStore',
      'image': 'assets/images/fogg-delivery-1.png',
      'desc': 'Fluxstore is on the way to serve you. '
    },
    {
      'title': 'Connect Surrounding World',
      'image': 'assets/images/fogg-uploading-1.png',
      'desc':
          'See all things happening around you just by a click in your phone. Fast, convenient and clean.'
    },
    {
      'title': "Let's Get Started",
      'image': 'assets/images/fogg-order-completed.png',
      'desc': "Waiting no more, let's see what we get!"
    }
  ],
in which: 'image' must be the local path to your image.
To disable or hide the Onboarding, set "onBoardingData": [],
To require Users to login before using the app, update IsRequiredLogin to true. Refer to lib/env.dart (For version 1.9.x and earlier, refer to lib/common/config/general.dart, in kLoginSetting):
  "loginSetting": {
    ...
    "IsRequiredLogin": true,
    ...
  },
To change Logo on Login screen, open lib/common/constants/images.dart, map your new image logo file:
const kLogoImage = 'assets/images/logo.png';3. Splash screen
Some clients asked, "How can I remove/ replace Fluxstore Logo and caption from the startup screen?". The answer is let's customize your Splash screen. From version 2.4 and onwards, please edit the splashScreen in /lib/env.dart file:
  "splashScreen": {
    "type": "flare",
    "image": "assets/images/splashscreen.flr",
    /// Have to set the animation name if you are using Rive or Flare type
    "animationName": "your-animation-name"
  }
in which:
- type: must be one of the followings: 'fade-in', 'zoom-in', 'zoom-out', 'top-down', 'rive', 'flare', ''static'
- image: your local asset to your image
- animationName: required only if you are using rive and flare type
kSplashScreenType to one of these options https://tppr.me/f0Wea
Make sure to update the
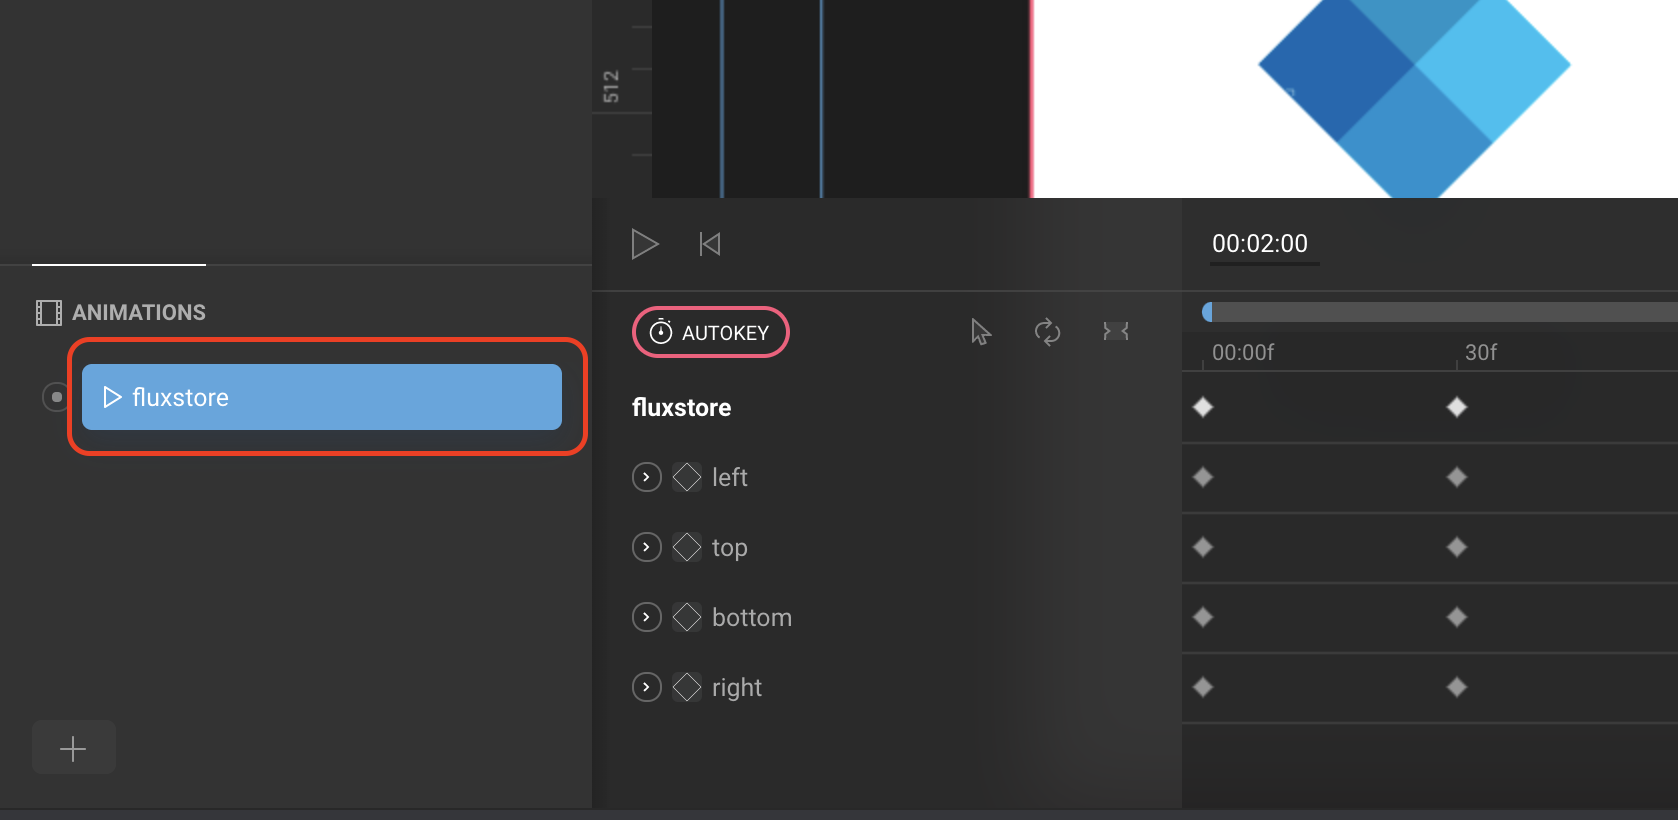
startAnimation to be the same as your Flare Dashboard, otherwise, the animation will not work. Open lib/widgets/common/splash_screen.dart:
      case SplashScreenTypeConstants.flare:
        return SplashScreen.navigate(
          ...
          startAnimation: 'fluxstore',
          ...
        );
To use Rive 2, please use this config:
  "splashScreen": {
    "type": "rive",
    /// This file is use for rive.app/ version 2
    "image": "assets/images/splashscreen.riv",
    /// Have to set the animation name if you are using RIVE 2.
    "animationName": "your-animation-name"
  }
🗳 Coding Guide: to change the flare animate file, go to this free tool https://rive.app and upload an example file .riv from the download package. Then edit the text, icon... to create your own splash screen. It's possible to update the splash screen as the static image files (PNG, JPG, and GIF) as well.
"image": "assets/images/splashscreen.png";// or "image": "assets/images/splashscreen.gif";
The kSplashScreen also supports the static images (PNG, JPG) or GIF. If you would like to replace the Flare animate, change the URL to a static file, example:
"image": "assets/images/load.gif'
🗳 To disable Splash screen: removing splash screen will require some customization on this file – https://tppr.me/uLdQZ
We will upgrade this option to disable flag on both FluxStore and FluxBuilder on the next release, in the meantime, you could try to use the blank image – https://tppr.me/fLEdW
4. Loading Animation
To change the loading animation (Loading indicator gif) between screens, open thelib/env.dart file and change the below value:
"loadingIcon": {"size": 30.0, "type": "fadingCube"}For version 1.9.x and earlier, change in lib/common/constants/loading.dart file:
Widget kLoadingWidget(context) => Center(
        child: SpinKitFadingCube(
          color: Theme.of(context).primaryColor,
          size: 30.0,
        ),
      );
Reference more detailed library config https://pub.dev/packages/flutter_spinkit
5. Drawer Layout (left menu side)
The New Left menu side is now easier to navigate between the Shop and other menu items. The menu could be opened by swiping from left to right or trigger by this function Scafford.of(context).openDrawer().
lib/env.dart and set to false:
  "defaultDrawer": {
    "logo": "assets/images/logo.png", ///change the logo on drawer here
    "items": [
      {"type": "home", "show": true},
      {"type": "blog", "show": true},
      {"type": "categories", "show": true},
      {"type": "cart", "show": true},
      {"type": "profile", "show": true},
      {"type": "login", "show": true},
      {"type": "category", "show": true}
    ]
  },
To change the icon of the Left menu, go to
lib/
modules/dynamic_layout/logo/logo.dart and change this information https://tppr.me/kFdd9
To change the left menu side content, go to
lib/menu/sidebar.dart Widget drawerItem(DrawerItemsConfig item) {
// final isTablet = Tools.isTablet(MediaQuery.of(context));if (item.show == false) return const SizedBox();
switch (item.type) {
case 'home':
{
return ListTile(
leading: Icon(
isEcommercePlatform ? Icons.home : Icons.shopping_basket,
size: 20,
),
title: Text(
isEcommercePlatform ? S.of(context).home : S.of(context).shop,
),
onTap: () {
pushNavigation(RouteList.home);
},
);
}
case 'categories':
{
return ListTile(
leading: const Icon(Icons.category, size: 20),
title: Text(S.of(context).categories),
onTap: () => pushNavigation(
Provider.of(context, listen: false).vendorType ==
VendorType.single
? RouteList.category
: RouteList.vendorCategory,
),
);
}
case 'profile':
{
return ListTile(
leading: const Icon(Icons.person, size: 20),
title: Text(S.of(context).settings),
onTap: () => pushNavigation(RouteList.profile),
);
}
case 'blog':
{
return ListTile(
leading: const Icon(CupertinoIcons.news_solid, size: 20),
title: Text(S.of(context).blog),
onTap: () => pushNavigation(RouteList.listBlog),
);
}...
Example: To change the title "Blog" to "News", you need to changetitle: Text(S.of(context).blog), to title: Text('News'),
6. Product Detail screen
1. Dynamic Product Variant
Open /lib/env.dart file, then customize the product variant values or order the display position. (For version 1.9.x and earlier, refer to /lib/common/config/products.dart; for version 1.6.4 and earlier, refer to lib/common/config.dart).
  "productVariantLayout": {
    "color": "color",
    "size": "box",
    "height": "option",
    "color-image": "image"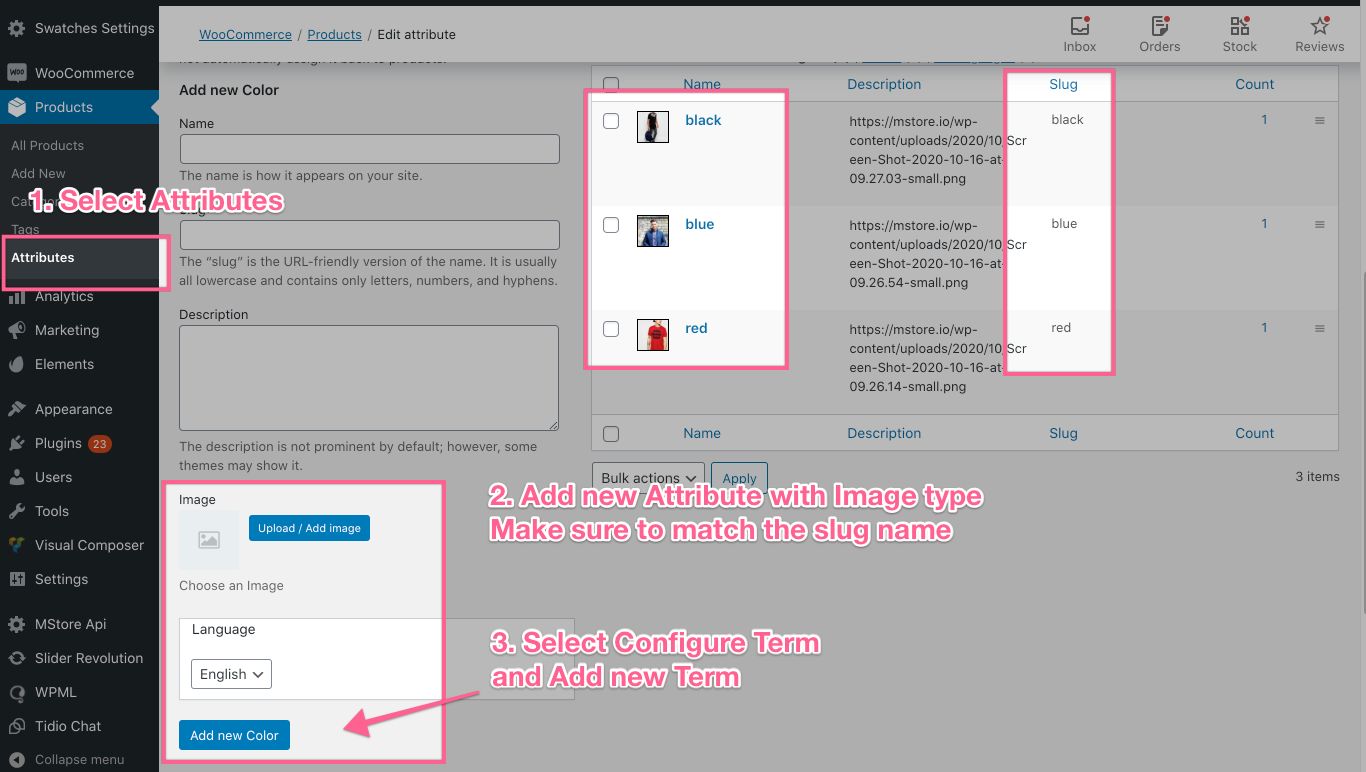
},key: should be matched with the variant slug name.value: support 3 types of layoutcolor,box,option, andimage(imageis for apps from version 1.8.2 onwards).- To use
image, please install Variation Swatches for WooCommerce plugin. Then add your attributes from WP admin > Products > Attributes. When adding attribute options, (*) copy the image link and paste it to the description as below:
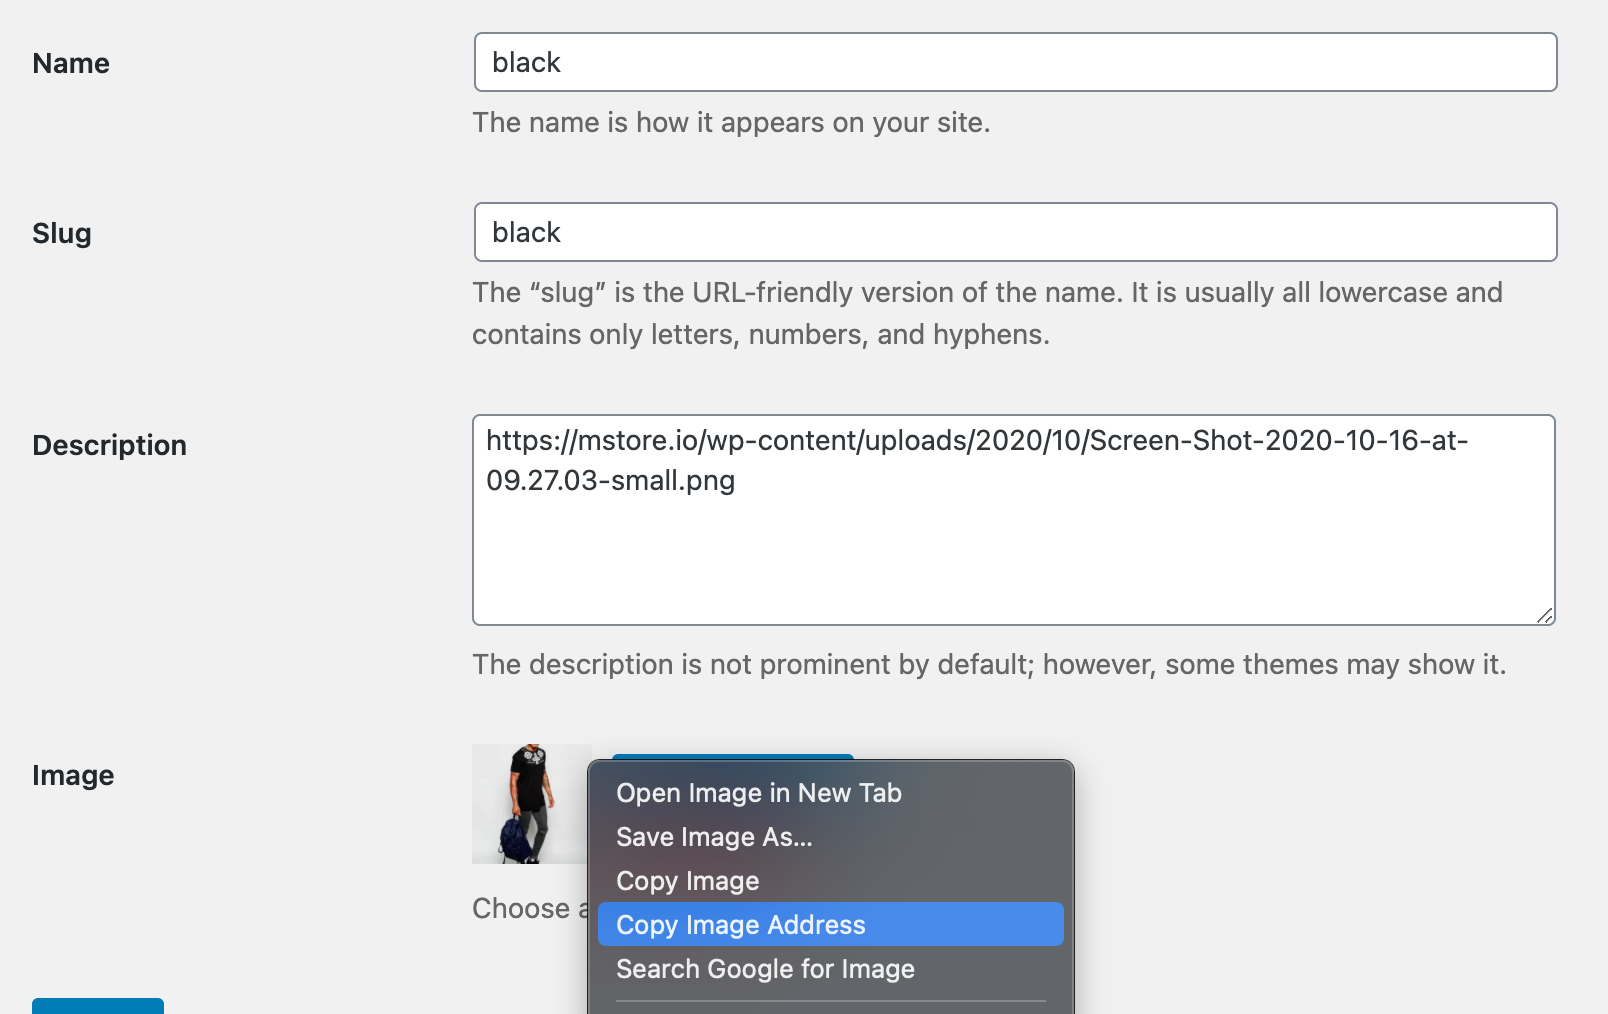 (*) This is required due to limitations from the plugin.
- Support multi-language for product attribute, edit the following setting:
  "productVariantLanguage": {
    "en": {
      "color": "Color",
      "size": "Size",
      "height": "Height",
      "color-image": "Color"
    },
    "ar": {
      "color": "اللون",
      "size": "بحجم",
      "height": "ارتفاع",
      "color-image": "اللون"
    },
    "vi": {
      "color": "Màu",
      "size": "Kích thước",
      "height": "Chiều Cao",
      "color-image": "Màu"
    }
  },
There was feedback from one of our customers to adjust the product detail design screen as he reports the default detail screen just matches with the Fashion UI. The team has made some more flexible product details upgraded by below config:
  "productDetail": {
    "height": 0.4,
    "marginTop": 0,
    ...
},heightthe percentage height of the featured product images.marginTopthe top margin with the top edge. This setting is to prevent cutting without using SafeArea widget.
2. Product Advance Options
Open lib/env.dart file, then customize the product variant values or order the display position. (For version 1.9.x and earlier, refer to lib/common/config/general.dart; for version 1.6.4 and earlier, refer to lib/common/config.dart).
  "advanceConfig": {
    "DefaultLanguage": "en",
    "DetailedBlogLayout": "halfSizeImageType",
    "EnablePointReward": true,
    "hideOutOfStock": false,
    "EnableRating": true,
    "hideEmptyProductListRating": true,
    "EnableShipping": true,
/// Enable search by SKU in search screen
"EnableSkuSearch": true,
/// Show stock Status on product List & Product Detail
"showStockStatus": true,
/// Gird count setting on Category screen
"GridCount": 3,
/// set isCaching to true if you have upload the config file to mstore-api
/// set kIsResizeImage to true if you have finished running Re-generate image plugin
/// ref: https://support.inspireui.com/help-center/articles/3/8/19/app-performance
"isCaching": false,
"kIsResizeImage": false,
/// Stripe payment only: set currencyCode and smallestUnitRate.
/// All API requests expect amounts to be provided in a currency’s smallest unit.
/// For example, to charge 10 USD, provide an amount value of 1000 (i.e., 1000 cents).
/// Reference: https://stripe.com/docs/currencies#zero-decimal
"DefaultCurrency": {
"symbol": "\$",
"decimalDigits": 2,
"symbolBeforeTheNumber": true,
"currency": "USD",
"currencyCode": "usd",
"smallestUnitRate": 100, // 100 cents = 1 usd
},
"Currencies": [
{
"symbol": "\$",
"decimalDigits": 2,
"symbolBeforeTheNumber": true,
"currency": "USD",
"currencyCode": "usd",
"smallestUnitRate": 100, // 100 cents = 1 usd
},
{
"symbol": "đ",
"decimalDigits": 2,
"symbolBeforeTheNumber": false,
"currency": "VND",
"currencyCode": "VND",
},
{
"symbol": "€",
"decimalDigits": 2,
"symbolBeforeTheNumber": true,
"currency": "EUR",
"currencyCode": "EUR",
},
{
"symbol": "£",
"decimalDigits": 2,
"symbolBeforeTheNumber": true,
"currency": "Pound sterling",
"currencyCode": "gbp",
"smallestUnitRate": 100, // 100 pennies = 1 pound
},
{
'symbol': 'AR\$',
'decimalDigits': 2,
'symbolBeforeTheNumber': true,
'currency': 'ARS',
'currencyCode': 'ARS',
}
],
/// Below config is used for Magento store
"DefaultStoreViewCode": "",
"EnableAttributesConfigurableProduct": ["color", "size"],
"EnableAttributesLabelConfigurableProduct": ["color", "size"],
/// if the woo commerce website supports multi languages
/// set false if the website only have one language
"isMultiLanguages": true,
///Review gets approved automatically on woocommerce admin without requiring administrator to approve.
"EnableApprovedReview": false,
/// Sync Cart from website and mobile
"EnableSyncCartFromWebsite": false,
"EnableSyncCartToWebsite": false,
/// Disable shopping Cart due to Listing Users request
"EnableShoppingCart": false,
/// Enable firebase to support FCM, realtime chat for Fluxstore MV
"EnableFirebase": true,
/// ratio Product Image, default value is 1.2 = height / width
"RatioProductImage": 1.2,
/// Enable Coupon Code When checkout
"EnableCouponCode": true,
/// Enable to Show Coupon list.
"ShowCouponList": true,
/// Enable this will show all coupons in Coupon list.
/// Disable will show only coupons which is restricted to the current user"s email.
"ShowAllCoupons": true,
/// Show expired coupons in Coupon list.
"ShowExpiredCoupons": true,
"AlwaysShowTabBar": false,
/// Privacy Policies page ID. Accessible in the app via Settings > Privacy menu.
"PrivacyPoliciesPageId": 25569,
/// The radius to get vendors in map view for Fluxstore MV
"QueryRadiusDistance": 10 //km},
- DefaultLanguage: the default language for the app.
- DetailedBlogLayout: to config the detailed layout of Blog. Change the kBlogLayout config to one of following enums: { simpleType, fullSizeImageType, halfSizeImageType, oneQuarterImageType }. Refer to https://support.inspireui.com/help-center/articles/3/8/11/customize-layout#3-blog-detail-layout for more detail.
- EnablePointReward: enable the Point and Reward Plugin, the feature will be displayed from the Setting screen, after logging into the app and purchasing the product, you can see the collection point, this is a good feature to custom for reward app.
- hideOutOfStock: hide the Out Of Stock feature from Product Detail.
- EnableRating: enable the Rating feature for Product detail.
- isCaching: this configuration helps Caching to improve App Performance. If the
isCachingis false, it will load as the local config. Refer to https://support.inspireui.com/help-center/articles/3/8/19/app-performance#1-caching-to-improve-app-performance for more details. - DefaultStoreViewCode: this is only used for Magento.
- EnableAttributesConfigurableProduct: this is only used for Magento, enable to activate the Configurable Product type.
- EnableAttributesLabelConfigurableProduct: this is only used for Magento, enable to activate the Configurable Product type.
- DefaultCurrency: default currency format.
-
Currencies: this is for the Currency Switcher feature. This feature is only available for the WooCommerce version, below is the required condition to activate this feature:
- Update the mstore-api to the latest version v1.5.4.
- Add new setting from Manage Currencies from WPML plugin:


The new release also supports the Affiliate Product Type when you configure values from the WooCommerce site.
Open lib/env.dart and config productDetail as below: (For version 1.9.x and earlier, refer to /lib/common/config/products.dart)
// TODO: 2-Update Product Detail Layouts
/// use to config the product image height for the product detail
/// height=(percent * width-screen)
  "productDetail": {
    "height": 0.4,
    "marginTop": 0,
    "safeArea": false,
    "showVideo": true,
    "showBrand": true,
    "showThumbnailAtLeast": 1,
    "layout": "simpleType",
    "borderRadius": 3.0,
/// Enable this to show review in product description.
"enableReview": false,
"attributeImagesSize": 50.0,
"showSku": true,
"showStockQuantity": true,
"showProductCategories": true,
"showProductTags": true,
"hideInvalidAttributes": false},
height: the percentage height of the featured product images. height=(percent * width-screen).marginTop: the top margin with the top edge. This setting is to prevent cutting without using SafeArea widget.safeArea: add new extra space on the top when viewing product detail.-
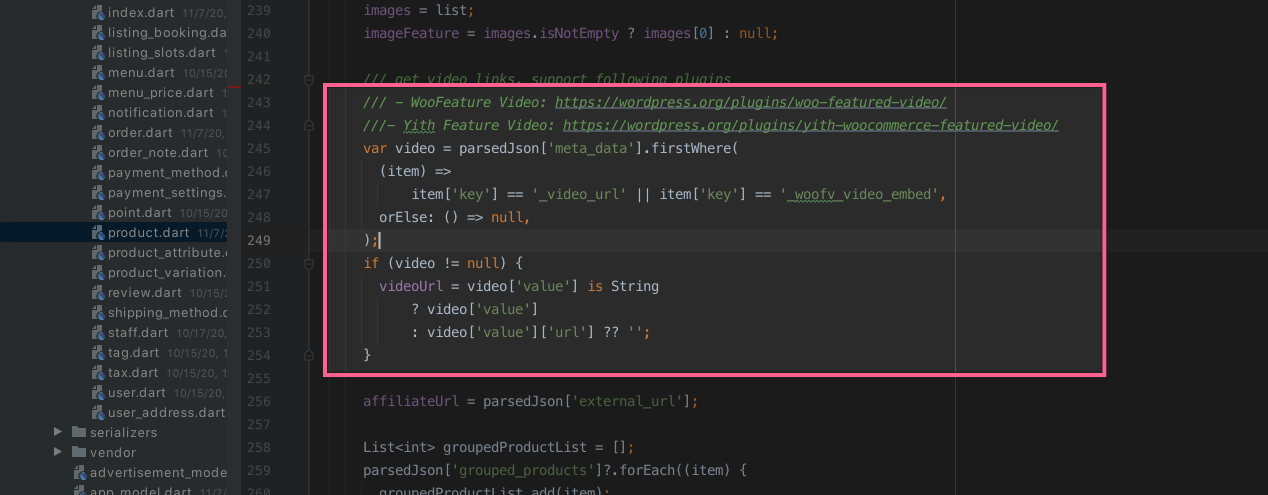
showVideo: support to enable the show Video feature. Support only for WooCommerce by installing one of the following video plugins:- WooFeature Video: https://wordpress.org/plugins/woo-featured-video/
- Yith Feature Video: https://wordpress.org/plugins/yith-woocommerce-featured-video/
showThumbnailAtLeast: only display the product detail gallery if more than the at least value. For example, if we set the value to 2, it only displays the image gallery when more than 3 images.layout: change to one of enum value { simpleType, fullSizeImageType, halfSizeImageType } - this is a great feature if you would like to change the Product Detail Screen to another Layout Design.
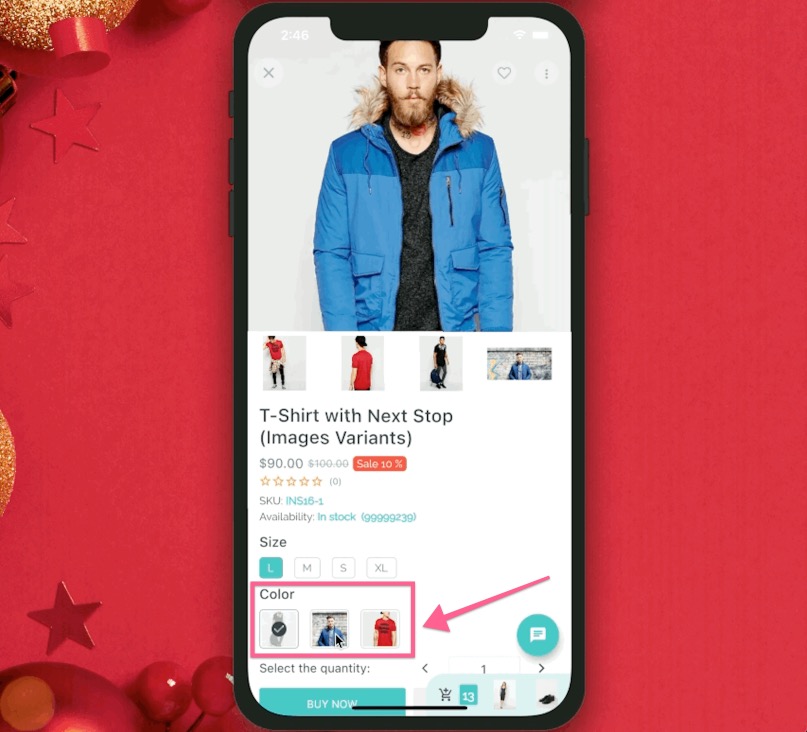
3. Product Image Options
This feature is currently compatible with WooCommerce (single and muli-Vendor). It is compatible with free WooCommerce Variation Swatches plugins.
4. Inline Video
This feature is currently compatible with WooCommerce (single and muli-Vendor).
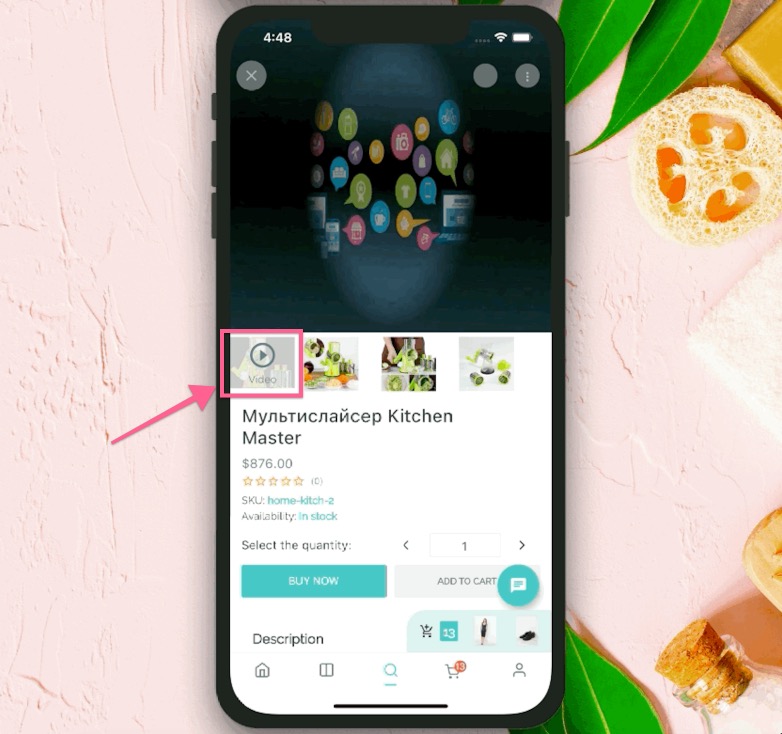
Current FluxStore is compatible with the following video plugins:
To integrate with other plugins you could customize the product Entity — lib/models/entities/product.dart:
7. Settings screen
1. Background image
This part guides to change the background image behind the Settings screen (profile section).Open
lib/common/constants/images.dart and update kProfileBackground as below:
const kProfileBackground =
    "https://images.unsplash.com/photo-1494253109108-2e30c049369b?ixlib=rb-1.2.1&auto=format&fit=crop&w=3150&q=80";
2. Dark Theme Setting
To change the background or customize your own colors, just simply go to thelib/common/theme/ folder:
- Open
dark_theme.dartfile and changebuildDarkThemefunction. - Open
light_theme.dartfile and changebuildLightThemefunction.
ThemeData buildDarkTheme(String language) {
  final ThemeData base = ThemeData.dark();
  return base.copyWith(
    textTheme: buildTextTheme(base.textTheme, language).apply(
      displayColor: kLightBG,
      bodyColor: kLightBG,
    ),
    primaryTextTheme: buildTextTheme(base.primaryTextTheme, language).apply(
      displayColor: kLightBG,
      bodyColor: kLightBG,
    ),
    accentTextTheme: buildTextTheme(base.accentTextTheme, language).apply(
      displayColor: kLightBG,
      bodyColor: kLightBG,
    ),
    canvasColor: kDarkBG,
    cardColor: kDarkBgLight,
    ...
}
To config the default theme is Dark theme, change this value from
false to true in lib/env.dart (From version 1.9.x and earlier, refer to lib/common/config/general.dart):
/// update default dark theme
/// advance color theme could be changed from common/styles.dart
"defaultDarkTheme": false,
3. App Rating
Open lib/env.dart file to change your value (For version 1.9.x and earlier, refer to lib/common/config/general.dart):
/// Use for Rating app on store feature
/// make sure to replace the bundle ID by your own ID to prevent the app review reject
  "storeIdentifier": {
    "disable": true,
    "android": "com.inspireui.fluxstore",
    "ios": "1469772800"
  },
Open lib/screens/settings/settings_screen.dart file to change the time for rating your app:
  final RateMyApp _rateMyApp = RateMyApp(
      // rate app on store
      minDays: 7,
      minLaunches: 10,
      remindDays: 7,
      remindLaunches: 10,
      googlePlayIdentifier: kStoreIdentifier['android'],
      appStoreIdentifier: kStoreIdentifier['ios']);
4. About Us
To change the URL of the About Us item in the Settings screen, open lib/common/constants/general.dart and change "aboutUsUrl" as below:
class SettingConstants {
  static const aboutUsUrl = "https://inspireui.com/about"; // replace your url here
}
To change title of About Us, open lib/screens/settings/settings_screen.dart file:
      case 'about':
        {
          icon = CupertinoIcons.info;
          title = "About Us";  //replace your title here
          ...
        }
To change Privacy and Term, refer to the next part "Page View".
5. Page View
Page view is used to display a static page faster than using WebView.

To add/delete/change a pageview widget on your Settings screen, open lib/env.dart, add/delete the value: (For version 1.9.x and earlier, refer to lib/common/config/general.dart, in kDefaultSettings)
// TODO: 3.Update The Setting Screens Menu
/// you could order the position to change menu
/// this feature could be done via Fluxbuilder
  "defaultSettings": [
    "products",
    "chat",
    "wishlist",
    "notifications",
    "language",
    "currencies",
    "darkTheme",
    "order",
    "point",
    "rating",
    "privacy",
    "about"
  ],
To set your pageID into PageView widget, please set as below located at your /lib/env.dart:
  /// Privacy Policies page ID. Accessible in the app via Settings > Privacy menu.
    "PrivacyPoliciesPageId": 25569,
To customize Privacy Page with a url, please edit the PrivacyPoliciesPageUrl in /lib/env.dart file (available from version 2.4 and onwards):
    /// Privacy Policies page ID. Accessible in the app via Settings > Privacy menu.
    "PrivacyPoliciesPageId": null,
/// If page id null
/// Privacy Policies page Url. Accessible in the app via Settings > Privacy menu.
"PrivacyPoliciesPageUrl": "https://mstore.io/",</code></pre>
6. Web View
In spite of the fact that a Web View widget takes more time to load compared to a Page View, Web View sometimes it could be taken into consideration due to its flexibility and adaptability. In order to add a WebView inside your app, please follow the guide below:


To add/delete/change a webview widget on your Settings screen, open lib/env.dart, add/delete the value: (For version 1.9.x and earlier, refer to lib/common/config/general.dart, in defaultSettings)
// TODO: 3.Update The Setting Screens Menu
/// you could order the position to change menu
/// this feature could be done via Fluxbuilder
"defaultSettings": [
"products",
"chat",
"wishlist",
"notifications",
"language",
"currencies",
"darkTheme",
"order",
"point",
"rating",
"privacy",
"about"
],
Open /lib/screens/settings/settings_screen.dart, inside renderItem, add/delete/change the below code in your desired position:
case value: //replace your value here, eg. 'about'
{
icon = CupertinoIcons.info;
title = S.of(context).webView; //replace your title here
trailing =
const Icon(Icons.arrow_forward_ios, size: 18, color: kGrey600);
onTap = () {
final about = subGeneralSetting['about'];
final aboutUrl = about?.webUrl ?? SettingConstants.aboutUsUrl; if (kIsWeb) {
return Tools.launchURL(aboutUrl);
}
return FluxNavigate.push(
MaterialPageRoute(
builder: (context) =>
WebView(
url: "https://inspireui.com", //replace your url here
title: S.of(context).webView), //replace your title here
),
),
forceRootNavigator: true,
);
};
break;
}
Example: Change the About Us on the Settings screen to FAQ with the URL https://inspireui.com/faq as below:
case 'about':
{
icon = CupertinoIcons.info;
title = "FAQ"; //replace your title here
trailing =
const Icon(Icons.arrow_forward_ios, size: 18, color: kGrey600);
onTap = () {
final about = subGeneralSetting['about'];
final aboutUrl = about?.webUrl ?? SettingConstants.aboutUsUrl;
if (kIsWeb) {
return Tools.launchURL(aboutUrl);
}
return FluxNavigate.push(
MaterialPageRoute(
builder: (context) =>
WebView(
url: "https://inspireui.com/faq", ///replace your url here
title: "FAQ"), ///replace your title here
),
),
forceRootNavigator: true,
);
};
break;
}
By default, the URL of WebView will be SettingConstants.aboutUsUrl which has been mentioned in Settings Screen > About us documents.
To customize Privacy Page with a url, please edit the PrivacyPoliciesPageUrl in /lib/env.dart file (available from version 2.4 and onwards):
/// Privacy Policies page ID. Accessible in the app via Settings > Privacy menu.
"PrivacyPoliciesPageId": null,
/// If page id null
/// Privacy Policies page Url. Accessible in the app via Settings > Privacy menu.
"PrivacyPoliciesPageUrl": "https://mstore.io/",</code></pre>
8. Price Filter
In the Filters, you can change the price filter. Currently, the lowest price filter is 0-100. To change this price, refer to lib/common/constants/slider.dart:
/// Filter value
const kSliderActiveColor = 0xFF2c3e50;
const kSliderInactiveColor = 0x992c3e50;
const kMaxPriceFilter = 1000.0;
const kFilterDivision = 10;
9. Google Analytics
FluxStore is already integrated with the Firebase Analytic, please help to check this guide - https://firebase.flutter.dev/docs/analytics/overview